How to enable Stage Manager (Screen Manager) on iPad? Apple has launched a new Stage Manager feature for some iPads through the iPadOS 16.1 update to help users “focus on tasks and switch between apps and windows with ease.” and faster than ever.”
Apple, Logic Pro and MainStage software updated
In this article, I will show you how to turn on Stage Manager on iPad, introduce how it works as well as a list of iPad models that support this feature.
What is Stage Manager?
Appearing as a controversial new feature for iPad and Mac through the iPadOS 16.1 and macOS Ventura updates, Stage Manager essentially automatically arranges open apps and windows so users can focus on them. Focus on your work and still see everything at a glance.
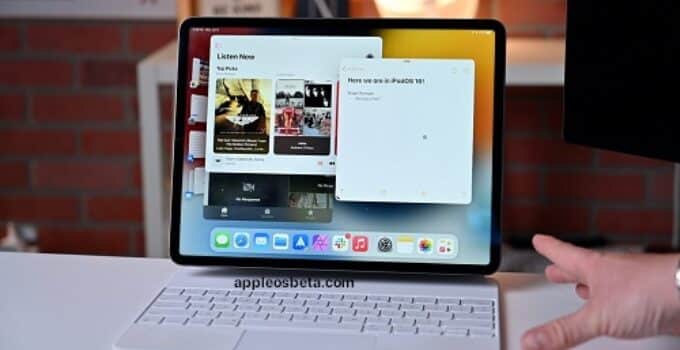
The interface of the window that the user is working on will be prominently displayed in the center of the screen, while other open windows will be reduced to a left corner to be able to switch between applications more quickly. . Users can also group windows together when working on specific tasks or projects that need different applications.
Besides, Stage Manager is also the most obvious decentralization feature (only for M1 chips), making it the subject of controversy between the user community and Apple. Eventually, Apple also had to give in and extend this feature to older iPad Pro lines, but now they have removed external display support from all iPad lines and promised to bring it back in an update. next.
List of iPads that support Stage Manager
Before you start, you should check if your iPad is on the supported list.
- iPad Pro 12.9-inch (3rd generation or later)
- iPad Pro 11-inch (1st generation or later)
- iPad Air (5th generation)
To check the model of iPad you are using, go to Settings – General – About – Model Name (Settings – General – About – Model Name).
How to enable Stage Manager on iPad?
- After updating to iPadOS 16.1, open Control Center (by pulling down from the top right corner of the screen).
- Tap the Desktop Manager button (the icon of 3 small squares and 1 large square near the bottom right corner).
- The first time you enable the feature, you’ll see an intro screen and a Turn on Stage Manager button.
- After that first time, the next time you just need to tap the icon in the Notification Center.
The Stage Manager toggle button will automatically be added to Control Center on iPadOS 16.1, but you can also rearrange its position by going to Settings – Control Center.
So now you can experience a computer-like interface right on your iPad. I will soon write a tutorial on how to use Stage Manager, in the meantime if you have any questions about this feature, please leave a comment below.


